Importing, Exporting, and working with Models with PSAMM
This part of the tutorial will focus on how to use PSAMM to convert files between the YAML format and other popular formats. An additional description of the YAML model format and its features is also provided here.
Import Functions in PSAMM
For information on how to install PSAMM and the associated requirements, as well how to download the materials required for this tutorial you can reference the Installation and Materials section of the tutorial.
Importing Existing Models (psamm-import)
In order to work with a metabolic model in PSAMM the model must be in the PSAMM-specific YAML format. This format allows for a human readable representation of the model components and allows for enhanced customization with respect to the organization of the metabolic model. This enhanced organization will allow for a more direct interaction with the metabolic model and make the model more accessible to both the modeler and experimental biologists.
Import Formats
The psamm-import program supports the import of models in various formats.
For the SBML format, it supports the COBRA-compliant SBML specifications, the FBC
specifications, and the basic SBML specifications in levels 1, 2, and 3;
for the JSON format, it supports the import of JSON files directly from the
BiGG database or from locally downloaded versions.
The support for importing from Excel file is model specific and are available for 17 published models. This import requires the installation of the separate psamm-import repository. There is also a generic Excel import for models produced that were produced by older versions of ModelSEED. Models from the current ModelSEED can be imported in the SBML format.
To install the psamm-import package for Excel format models use the following
command:
(psamm-env) $ pip install git+https://github.com/zhanglab/psamm-import.git
This install will make the Excel importers available from the command line when the
psamm-import program is called.
To see a list of the models or model formats that are supported for import, use the command:
(psamm-env) $ psamm-import list
In the output, you will see a list of specific Excel models that are supported
by psamm-import as well as the different SBML parsers that are available in
PSAMM:
Generic importers:
json          COBRApy JSON
modelseed     ModelSEED model (Excel format)
sbml          SBML model (non-strict)
sbml-strict   SBML model (strict)

Model-specific importers:
icce806       Cyanothece sp. ATCC 51142 iCce806 (Excel format), Vu et al., 2012
ecoli_textbook  Escerichia coli Textbook (core) model (Excel format), Orth et al., 2010
ijo1366       Escerichia coli iJO1366 (Excel format), Orth et al., 2011
gsmn-tb       Mycobacterium tuberculosis GSMN-TB (Excel format), Beste et al., 2007
inj661        Mycobacterium tuberculosis iNJ661 (Excel format), Jamshidi et al., 2007
inj661m       Mycobacterium tuberculosis iNJ661m (Excel format), Fang et al., 2010
inj661v       Mycobacterium tuberculosis iNJ661v (Excel format), Fang et al., 2010
ijn746        Pseudomonas putida iJN746 (Excel format), Nogales et al., 2011
ijp815        Pseudomonas putida iJP815 (Excel format), Puchalka et al., 2008
stm_v1.0      Salmonella enterica STM_v1.0 (Excel format), Thiele et al., 2011
ima945        Salmonella enterica iMA945 (Excel format), AbuOun et al., 2009
irr1083       Salmonella enterica iRR1083 (Excel format), Raghunathan et al., 2009
ios217_672    Shewanella denitrificans OS217 iOS217_672 (Excel format), Ong et al., 2014
imr1_799      Shewanella oneidensis MR-1 iMR1_799 (Excel format), Ong et al., 2014
imr4_812      Shewanella sp. MR-4 iMR4_812 (Excel format), Ong et al., 2014
iw3181_789    Shewanella sp. W3-18-1 iW3181_789 (Excel format), Ong et al., 2014
isyn731       Synechocystis sp. PCC 6803 iSyn731 (Excel format), Saha et al., 2012
Now the model can be imported using the psamm-import functions. Return to
the psamm-tutorial folder if you have left it using the following command:
(psamm-env) $ cd <PATH>/tutorial-part-1
Importing an SBML Model
In this tutorial, we will use the E. coli textbook core model [Orth13] as an
example to demonstrate these functions in PSAMM. First, we will convert the model
from the SBML model. To import the E_coli_core.xml model to YAML format run
the following command:
(psamm-env) $ psamm-import sbml --source E_coli_sbml/ecoli_core_model.xml --dest E_coli_yaml
This will convert the SBML file in the E_coli_sbml directory into the YAML
format that will be stored in the E_coli_yaml/ directory. The output will
give the basic statistics of the model and should look like this:
...
WARNING: Species M_pyr_b was converted to boundary condition because of "_b" suffix
WARNING: Species M_succ_b was converted to boundary condition because of "_b" suffix
INFO: Detected biomass reaction: R_Biomass_Ecoli_core_w_GAM
INFO: Removing compound prefix 'M_'
INFO: Removing reaction prefix 'R_'
INFO: Removing compartment prefix 'C_'
Model: Ecoli_core_model
- Biomass reaction: Biomass_Ecoli_core_w_GAM
- Compartments: 2
- Compounds: 72
- Reactions: 95
- Genes: 137
INFO: e is extracellular compartment
INFO: Using default flux limit of 1000.0
INFO: Converting exchange reactions to exchange file
psamm-import will produce some warnings if there are any aspects of the
model that are going to be changed during import. In this case the warnings are
notifying you that the metabolites with a _b suffix have been converted to the
boundary conditions of the model. There will also be information on what prefixes
were removed from the metabolite IDs and if the importer was able to identify the
Biomass Reaction in the model. This information is important to check to make sure
that the model was imported correctly. After the import the model will be available
and ready to use for any other PSAMM functions.
Importing an Excel Model
The process of importing an Excel model is the same as importing an SBML model except that you will need to specify the specific model name in the command. The list of supported models can be seen using the list function above. An example of an Excel model import is below:
(psamm-env) $ psamm-import ecoli_textbook --source E_coli_excel/ecoli_core_model.xls --dest converted_excel_model
This will produce a YAML version of the Excel model in the
converted_excel_model/ directory.
Since the Excel models are not in a standardized format these parsers need to be developed on a model-by-model basis in order to parse all of the relevant information out of the model. This means that the parser can only be used for the listed models and not for a general import.
Importing a JSON Model
psamm-import also supports the conversion of JSON format models that follows
the conventions in COBRApy. If the JSON model is stored locally, it can be
converted with the following command:
(psamm-env) $ psamm-import json --source E_coli_json/e_coli_core.json --dest converted_json_model/
Alternatively, an extension of the JSON importer has been provided,
psamm-import-bigg, which can be applied to convert JSON models from BiGG
database. To see the list of available models on the BiGG database the
following command can be used:
(psamm-env) $ psamm-import-bigg list
This will show the available models as well as their names. You can then import any of these models to YAML format. For example, using the following command to import the E. coli iJO1366 [Orth11] model from the BiGG database:
(psamm-env) $ psamm-import-bigg iJO1366 --dest converted_json_model_bigg/
Note
To use psamm-import-bigg you must have internet access to download the
models remotely.
YAML Format and Model Organization
Now that we have imported the models into the YAML format we can take a look
at what the different files are and what information they contain.
The PSAMM YAML format stores individual models under a designated directory,
in which there will be a number of files that stores the information of the
model and specifies the simulation conditions. The entry point of the YAML
model is a file named model.yaml, which points to additional files that
store the information of the model components, including compounds, reactions,
flux limits, exchange conditions, etc. While we recommend that you use the name
model.yaml for the central reference file, the file names for the included
files are flexible and can be customized as you prefer. In this tutorial, we
simply used the names: compounds.yaml, reactions.yaml, limits.yaml,
and exchange.yaml for the included files.
First change directory into E_coli_yaml:
(psamm-env) $ cd E_coli_yaml/
The directory contains the main model.yaml file as well as the other files
that contain the model data:
(psamm-env) $ ls
compounds.yaml
exchange.yaml
limits.yaml
model.yaml
reactions.yaml
These files can be opened using any standard text editor. We highly recommend
using an editor that includes syntax highlighting for the YAML language (one such
editor is the Atom editor which includes built-in support for YAML and is
available for macOS, Linux and Windows). You can also use commands like
less and editors like vi or nano to quickly inspect and edit
the files from the command line:
(psamm-env) $ less <file_name>.yaml
The central file in this organization is the model.yaml file. The following
is an example of the model.yaml file that is obtained from the import of
the E. coli textbook model. The model.yaml file for this imported SBML
model should look like the following:
name: Ecoli_core_model
biomass: Biomass_Ecoli_core_w_GAM
default_flux_limit: 1000.0
compartments:
- id: c
  adjacent_to: e
  name: Cytoplasm
- id: e
  adjacent_to: c
  name: Extracellular
compounds:
- include: compounds.yaml
reactions:
- include: reactions.yaml
exchange:
- include: exchange.yaml
limits:
- include: limits.yaml
The model.yaml file defines the basic components of a metabolic model,
including the model name (Ecoli_core_model), the biomass function
(Biomass_Ecoli_core_w_GAM), the compound files (compounds.yaml), the
reaction files (reactions.yaml), the flux boundaries (limits.yaml), and
the exchange conditions (exchange.yaml). The additional files are defined using
include functions. This organization allows you to easily change
aspects of the model like the exchange reactions by simply referencing a
different exchange file in the central model.yaml definition. In addition to the
information on the other components of the model there will also be details on the
compartment information for the model. This will provide an overview of how compartments
are related to each other and what their abbreviations and names are. For this small
model there is only an e and a c compartment representing the cytoplasm
and extracellular space but more complex cells with multiple compartments
can also be represented.
This format can also be used to include multiple files in the list of
reactions and compounds. This feature can be useful, for example, if you
want to name different reaction files based on the subsystem designations or
cellular compartments, or if you want to separate the temporary reactions
that are used to fill reaction gaps from the main model. An example of how you
could designate multiple reaction files is found below. This file can be found
in the additional files folder in the file complex_model.yaml.
name: Ecoli_core_model
biomass: Biomass_Ecoli_core_w_GAM
default_flux_limit: 1000.0
compartments:
- id: c
  adjacent_to: e
  name: Cytoplasm
- id: e
  adjacent_to: c
  name: Extracellular
model:
- include: core_model_definition.tsv
compounds:
- include: compounds.yaml
reactions:
- include: reactions/cytoplasm.yaml
- include: reactions/periplasm.yaml
- include: reactions/transporters.yaml
- include: reactions/extracellular.yaml
exchange:
- include: exchange.yaml
limits:
- include: limits.yaml
As can be seen here the modeler chose to distribute their reaction database files into different files representing various cellular compartments and roles. This organization can be customized to suit your preferred workflow.
There are also situations where you may wish to designate only a subset of the reaction database in a metabolic simulation. In these situations it is possible to use a model definition file to identify which subset of reactions will be used from the larger database. The model definition file is simply a list of reaction IDs that will be included in the simulation.
An example of how to include a model definition file can be found below.
name: Ecoli_core_model
biomass: Biomass_Ecoli_core_w_GAM
default_flux_limit: 1000.0
compartments:
- id: c
  adjacent_to: e
  name: Cytoplasm
- id: e
  adjacent_to: c
  name: Extracellular
model:
- include: subset.tsv
compounds:
- include: compounds.yaml
reactions:
- include: reactions.yaml
exchange:
- include: exchange.yaml
limits:
- include: limits.yaml
Note
When the model definition file is not identified, PSAMM will include the entire reaction database in the model. However, when it is identified, PSAMM will only include the reactions that are listed in the model definition file in the model. This design can be useful when you want to make targeted tests on a subset of the model or when you want to include a larger database for use with the gap filling functions.
Reactions
The reactions.yaml file is where the reaction information is stored in the
model. A sample from this file can be seen below:
- id: ACALD
  name: acetaldehyde dehydrogenase (acetylating)
  genes: b0351 or b1241
  equation: '|acald[c]| + |coa[c]| + |nad[c]| <=> |accoa[c]| + |h[c]| +
    |nadh[c]|'
  subsystem: Pyruvate Metabolism
- id: ACALDt
  name: acetaldehyde reversible transport
  genes: s0001
  equation: '|acald[e]| <=> |acald[c]|'
  subsystem: Transport, Extracellular
Each reaction entry is designated with the reaction ID first. Then the various
properties of the reaction can be listed below it. The required properties for
a reaction are ID and equation. Along with these required attributes others
can be included as needed in a specific project. These can include but are not
limited to EC numbers, subsystems, names, and genes associated with the
reaction. For example, in a collaborative reconstruction you may want to
include a field named authors to identify which authors have contributed to
the curation of a particular reaction.
Reaction equations can be formatted in multiple ways to allow for more
flexibility during the modeling process. The reactions can be formatted in a
string format based on the ModelSEED reaction format. In this representation
individual compounds in the reaction are represented as compound IDs followed by
the cellular compartment in brackets, bordered on both sides by single pipes.
For example if a hydrogen compound, Hydr, in a cytosol compartment
was going to be in an equation it would be represented as follows:
|Hydr[cytosol]|
These individual compounds can be assigned stoichiometric coefficients by adding a number in parentheses before the compound. For example if a reaction contained two hydrogens it could appear as follows:
(2) |Hydr[cytosol]|
These individual components are separated by + signs in the reaction string. The separation of the reactants and products is through the use of an equal sign with greater than or less than signs designating directionality. These could include => or <= for reactions that can only progress in one direction or <=> for reactions that can progress in both directions. An example of a correctly formatted reaction could be as follows:
'|ac[c]| + |atp[c]| <=> |actp[c]| + |adp[c]|'
For longer reactions the YAML format provides a way to list each reaction component on a single line. For example a reaction could be represented as follows:
- id: ACKr
  name: acetate kinase
  equation:
    compartment: c
    reversible: yes
    left:
      - id: ac_c
        value: 1
      - id: atp_c
        value: 1
    right:
      - id: actp_c
        value: 1
      - id: adp_c
        value: 1
  subsystem: Pyruvate Metabolism
This line based format can be especially helpful when dealing with larger equations like biomass reactions where there can be dozens of components in a single reaction.
Gene associations for the reactions in a model can also be included in the
reaction definitions so that gene essentiality experiments can be performed
with the model. These genes associations are included by adding the genes
property to the reaction like follows:
- id: ACALDt
  name: acetaldehyde reversible transport
  equation: '|acald[e]| <=> |acald[c]|'
  subsystem: Transport, Extracellular
  genes: gene_0001
More complex gene associations can also be included by using logical and/or statements in the genes property. When performing gene essentiality simulations this logic will be taken into account. Some examples of using this logic with the genes property can be seen below:
genes: gene_0001 or gene_0002

genes: gene_0003 and gene_0004

genes: gene_0003 and gene_0004 or gene_0005 and gene_0006

genes: gene_0001 and (gene_0002 or gene_0003)
Compounds
The compounds.yaml file is organized in a similar way as the
reactions.yaml. An example can be seen below.
- id: 13dpg_c
  name: 3-Phospho-D-glyceroyl-phosphate
  formula: C3H4O10P2
- id: 2pg_c
  name: D-Glycerate-2-phosphate
  formula: C3H4O7P
- id: 3pg_c
  name: 3-Phospho-D-glycerate
  formula: C3H4O7P
The compound entries begin with a compound ID which is then followed by the compound properties. These properties can include a name, chemical formula, and charge of the compound.
Limits
The limits file is used to designate reaction flux limits when it is different
from the defaults in PSAMM. By default, PSAMM would assign the lower and
upper bounds to reactions based on their reversibility, i.e. the boundary of
reversible reactions are \(-1000 \leq v_j \leq 1000\), and the boundary for
irreversible reactions are \(0 \leq v_j \leq 1000\). Therefore, the
limits.yaml file will consist of only the reaction boundaries that are
different from these default values. For example, if you want to force flux
through an artificial reaction like the ATP maintenance reaction ATPM you
can add in a lower limit for the reaction in the limits file like this:
- reaction: ATPM
  lower: 8.39
Each entry in the limits file includes a reaction ID followed by upper and lower limits. Note that when a model is imported only the non-default flux limits are explicitly stated, so some of the imported models will not contain a predefined limits file. In the E. coli core model, only one reaction has a non-default limit. This reaction is an ATP maintenance reaction and the modelers chose to force a certain level of flux through it to simulate the general energy cost of cellular maintenance processes.
Exchange
The exchange file is where you can designate the boundary conditions for the
model. The compartment of the exchange compounds can be designated using the
compartment tag, and if omitted, the extracellular compartment (e) will
be assumed. An example of the exchange file can be seen below.
compounds:
- id: ac_e
  reaction: EX_ac_e
  lower: 0.0
- id: acald_e
  reaction: EX_acald_e
  lower: 0.0
- id: akg_e
  reaction: EX_akg_e
  lower: 0.0
- id: co2_e
  reaction: EX_co2_e
Each entry starts with the ID of the boundary compound and followed by lines that defines the lower and upper limits of the compound flux. Internally, PSAMM will translate these boundary compounds into exchange reactions in metabolic models. Additional properties can be designated for the exchange reactions including an ID for the reaction, the compartment for the reaction, and lower and upper flux bounds for the reaction. In the same way that only non-standard limits need to be specified in the limits file, only non-standard exchange limits need to be specified in the exchange file. This can be seen with the example above where the upper limits are not set since they should just be the default limit of 1000.
Model Format Customization
The YAML model format is highly customizable to suit your preferences.
File names can be changed according to your own design. These customizations
are all allowed by PSAMM as long as the central model.yaml file is also
updated to reflect the different file names referred. While all the file names
can be changed it is recommended that the central model.yaml file name does
not change. PSAMM will automatically detect and read the information from the
file if it is named model.yaml. If you do wish to also alter the name of
this file you will need to specify the path of your model file using
the --model option whenever any PSAMM commands are run. For
example, to run FBA with a different central model file named
ecoli_model.yaml, you could run the command like this:
(psamm-env) $ psamm-model --model ecoli_model.yaml fba
Version Control with the YAML Format
The YAML format contains a logical division of the model information and allows for easier modification and interaction with the model. Moreover, the text-based representation of YAML files can enable the tracking of model modifications using version control systems. In this tutorial we will demonstrate the use of the Git version control system during model development to track the changes that have been added to an existing model. This feature will improve the documentation of the model development process and improve collaborative annotations during model curation.
A broad overview of how to use various Git features can be found here: Git
Initiate a Git Repository for the YAML Model
Throughout this tutorial version tracking using Git will be highlighted in various sections. As you follow along with the tutorial you can try to run the Git commands to get a sense of how Git and PSAMM work together. We will also highlight how the features of Git help with model curation and development when using the YAML format.
To start using Git to track the changes in this git model the folder must first be initialized as a Git repository. To do this first enter the YAML model directory and use the following command:
(psamm-env) $ git init
Initialized empty Git repository in <...>/psamm-tutorial/E_coli_yaml/.git/
After the folder is initialized as a Git repository the files that were initially imported from the SBML version can be added to the repository using the following command:
(psamm-env) $ git add *.yaml
this will stage all of the files with the yaml extension to be committed.
Then the addition of these files can be added to the repository to be tracked
by using the following command:
(psamm-env) $ git commit -m 'Initial import of E. coli Core Model'
Now these files will be tracked by Git and any changes that are made will be easily viewable using various Git commands. PSAMM will also print out the Git commit ID when any commands are run. This makes it easier for you to track exactly what version of the model a past simulation was done on.
The next step in the tutorial will be to add in a new carbon utilization pathway to the E. coli core model and Git will be used to track these new additions and manage the curation in an easy to track manner. The tutorial will return to the version tracking at various points in order to show how this can be used during model development.
FBA on Model Before Expansion
Now that the model is imported and being tracked by Git it will be helpful to do a quick simulation to confirm that the model is complete and able to generate flux. To do this you can run the FBA command in the model directory:
(psamm-env) $ psamm-model fba
The following is a sample of the output from this initial flux balance analysis. It can be seen that the model is generating flux through the objective function and seems to be a complete working model. Now that this is known any future changes that are made to the model can be made with the knowledge that the unchanged model was able to generate biomass flux.
ACONTa      6.00724957535   |Citrate[c]| <=> |cis-Aconitate[c]| + |H2O[c]|  b0118 or b1276
ACONTb      6.00724957535   |cis-Aconitate[c]| + |H2O[c]| <=> |Isocitrate[c]|       b0118 or b1276
...
INFO: Objective flux: 0.873921506968
Adding a new Pathway to the Model
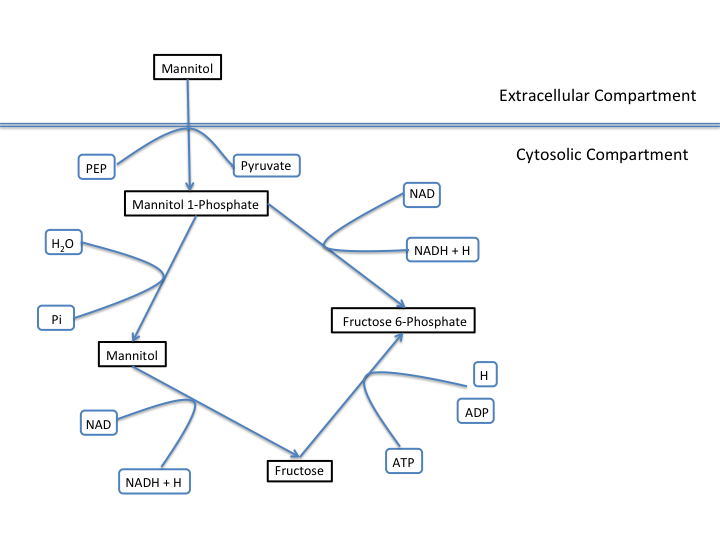
The E. coli textbook model that was imported above is a small model representing the core metabolism of E. coli. This model is great for small tests and demonstrations due to its size and excellent curation. For the purposes of this tutorial this textbook model will be modified to include a new metabolic pathway for the utilization of D-Mannitol by E. coli. This is a simple pathway which involves the transport of D-Mannitol via the PTS system and then the conversion of D-Mannitol 1-Phosphate to D-Fructose 6-Phosphate. Theoretically the inclusion of this pathway should allow the model to utilize D-Mannitol as a sole carbon source. Along with this direct pathway another set of reactions will be added that remove the phosphate from the mannitol 1-phosphate to create cytoplasmic mannitol which can then be converted to fructose and then to fructose 6-phosphate.
To add these reactions, there will need to be three components added to the model. First the new reactions will be added to the model, then the relevant exchange reactions, and finally the compound information.
The new reactions in the database can be added directly to the already
generated reactions file but for this case they will be added to a separate
database file that can then be added to the model through the include function
in the model.yaml file.
A reaction database file named mannitol_path.yaml is supplied in
additional_files folder. This file can be added into the model.yaml
file by copying it to your working folder using the following command:
(psamm-env) $ cp ../additional_files/mannitol_pathway.yaml .
And then specifying it in the model.yaml file by adding the following line
in the reactions section:
reactions:
- include: reactions.yaml
- include: mannitol_pathway.yaml
Alternatively you can copy an already changed model.yaml file from the
additional files folder using the following command:
(psamm-env) $ cp ../additional_files/model.yaml .
This line tells PSAMM that these reactions are also going to be included in the model simulations.
Now you can test the model again to see if there were any effects from these new reactions added in. To run an FBA simulation you can use the following command:
(psamm-env) $ psamm-model fba --all-reactions
The --all-reactions option makes the command write out all reactions in
the model even if they have a flux of zero in the simulation result. It can be
seen that the newly added reactions are being read into the model
since they do appear in the output. For example the MANNI1DEH reaction can be
seen in the FBA output and it can be seen that this reaction is not carrying
any flux. This is because there is no exchange reaction added into the model that
would provide mannitol.
FRUKIN      0.0     |fru[c]| + |ATP[c]| => |D-Fructose-6-phosphate[c]| + |ADP[c]| + |H[c]|
...
MANNI1PDEH  0.0     |Nicotinamide-adenine-dinucleotide[c]| + |manni1p[c]| => |D-Fructose-6-phosphate[c]| + |H[c]| + |Nicotinamide-adenine-dinucleotide-reduced[c]|
MANNI1PPHOS 0.0     |manni1p[c]| + |H2O[c]| => |manni[c]| + |Phosphate[c]|
MANNIDEH    0.0     |Nicotinamide-adenine-dinucleotide[c]| + |manni[c]| => |Nicotinamide-adenine-dinucleotide-reduced[c]| + |fru[c]|
MANNIPTS    0.0     |manni[e]| + |Phosphoenolpyruvate[c]| => |manni1p[c]| + |Pyruvate[c]|
...
Changing the Boundary Definitions Through the Exchange File
To add new exchange reactions to the model a modified exchange.yaml file has
been included in the additional files. This new boundary condition could be
added by creating a new entry in the existing exchange.yaml file but for this
tutorial the exchange file can be changed by running the following command:
(psamm-env) $ cp ../additional_files/exchange.yaml .
This will simulate adding in the new mannitol compound into the exchange file as well as setting the uptake of glucose to be zero.
Now you can track changes to the exchange file using the Git command:
(psamm-env) $ git diff exchange.yaml
From the output, it can be seen that a new entry was added in the exchange file to add the mannitol exchange reaction and that the lower flux limit for glucose uptake was changed to zero. This will ensure that any future simulations done with the model in these conditions will only have mannitol available as a carbon source.
@@ -1,5 +1,7 @@
 name: Default medium
 compounds:
+- id: manni
+  lower: -10
 - id: ac_e
   reaction: EX_ac
   lower: 0.0
@@ -25,7 +27,7 @@
   lower: 0.0
 - id: glc_D_e
   reaction: EX_glc
-  lower: -10.0
+  lower: 0.0
 - id: gln_L_e
   reaction: EX_gln_L
   lower: 0.0
In this case the Git output indicates what lines were added or removed from the previous version. Added lines are indicated with a plus sign next to them. These are the new lines in the new version of the file. The lines with a minus sign next to them are the line versions from the old format of the file. This makes it easy to figure out exactly what changed between the new and old version of the file.
Now you can test out if the new reactions are functioning in the model. Since there is no other carbon source, if the model sustains flux through the biomass reaction it must be from the supplied mannitol. The following command can be used to run FBA on the model:
(psamm-env) $ psamm-model fba --all-reactions
From the output it can be seen that there is flux through the biomass reaction and that the mannitol utilization reactions are being used. In this situation it can also be seen that the pathway that converts mannitol to fructose first is not being used.
FRUKIN      0.0     |fru[c]| + |ATP[c]| => |D-Fructose-6-phosphate[c]| + |ADP[c]| + |H[c]|
...
MANNI1PDEH  10.0    |Nicotinamide-adenine-dinucleotide[c]| + |manni1p[c]| => |D-Fructose-6-phosphate[c]| + |H[c]| + |Nicotinamide-adenine-dinucleotide-reduced[c]|
MANNI1PPHOS 0.0     |manni1p[c]| + |H2O[c]| => |manni[c]| + |Phosphate[c]|
MANNIDEH    0.0     |Nicotinamide-adenine-dinucleotide[c]| + |manni[c]| => |Nicotinamide-adenine-dinucleotide-reduced[c]| + |fru[c]|
MANNIPTS    10.0    |manni[e]| + |Phosphoenolpyruvate[c]| => |manni1p[c]| + |Pyruvate[c]|
You can also choose to maximize other reactions in the network. For example this could be used to analyze the network when production of a certain metabolite is maximized or to quickly change between different objective functions that are in the model. To do this you will just need to specify a reaction ID in the command and that will be used as the objective function for that simulation. For example if you wanted to analyze the network when the FRUKIN reaction is maximized the following command can be used:
(psamm-env) $ psamm-model fba --objective=FRUKIN --all-reactions
It can be seen from this simulation that the FRUKIN reaction is now being used and that the fluxes through the network have changed from when the biomass function was used as the objective function.
...
EX_lac_D_e  20.0    |D-Lactate[e]| <=>
EX_manni_e  -10.0   |manni[e]| <=>
EX_o2_e     -5.0    |O2[e]| <=>
EX_pi_e     0.0     |Phosphate[e]| <=>
EX_pyr_e    0.0     |Pyruvate[e]| <=>
EX_succ_e   0.0     |Succinate[e]| <=>
FBA 10.0    |D-Fructose-1-6-bisphosphate[c]| <=> |Dihydroxyacetone-phosphate[c]| + |Glyceraldehyde-3-phosphate[c]|  b2097 or b1773 or b2925
FBP 0.0     |D-Fructose-1-6-bisphosphate[c]| + |H2O[c]| => |D-Fructose-6-phosphate[c]| + |Phosphate[c]|     b3925 or b4232
FORt2       0.0     |Formate[e]| + |H[e]| => |Formate[c]| + |H[c]|  b0904 or b2492
FORti       0.0     |Formate[c]| => |Formate[e]|    b0904 or b2492
FRD7        0.0     |Fumarate[c]| + |Ubiquinol-8[c]| => |Ubiquinone-8[c]| + |Succinate[c]|  b4151 and b4152 and b4153 and b4154
FRUKIN      10.0    |fru[c]| + |ATP[c]| => |D-Fructose-6-phosphate[c]| + |ADP[c]| + |H[c]|
...
Adding new Compounds to the Model
In the previous two steps the reactions and boundary conditions were added
into the model. There was no information added in about what the compounds in
these reactions actually are but PSAMM is still able to treat them as
metabolites in the network and utilize them accordingly. It will be helpful if
there is information on these compounds in the model. This will allow you
to use the various curation tools and will allow PSAMM to use the new
compound names in the output of these various simulations. To add the new
compounds to the model a modified compounds.yaml file has been provided in
the additional_files folder. These compounds can be entered into the
existing compounds.yaml file but for this tutorial the new version can be
copied over by running the following command.
(psamm-env) $ cp ../additional_files/compounds.yaml .
Using the diff command in Git, you will be able to identify changes in the new
compounds.yaml file:
(psamm-env) $ git diff compounds.yaml
It can be seen that the new compound entries added to the model were the various new compounds involved in this new pathway.
@@ -1,3 +1,12 @@
+- id: fru_c
+  name: Fructose
+  formula: C6H12O6
+- id: manni
+  name: Mannitol
+  formula: C6H14O6
+- id: manni1p
+  name: Mannitol 1-phosphate
+  formula: C6H13O9P
 - id: 13dpg_c
   name: 3-Phospho-D-glyceroyl-phosphate
   formula: C3H4O10P2
This will simulate adding in the new compounds to the existing database. Now you can run another FBA simulation to check if these new compound properties are being incorporated into the model. To do this run the following command:
(psamm-env) $ psamm-model fba --all-reactions
It can be seen that the reactions are no longer represented with compound IDs but are now represented with the compound names. This is because the new compound features are now being added to the model.
EX_manni_e  -10.0   |Mannitol[e]| <=>
...
FRUKIN      0.0     |Fructose[c]| + |ATP[c]| => |D-Fructose-6-phosphate[c]| + |ADP[c]| + |H[c]|
...
MANNI1PDEH  10.0    |Nicotinamide-adenine-dinucleotide[c]| + |Mannitol 1-phosphate[c]| => |D-Fructose-6-phosphate[c]| + |H[c]| + |Nicotinamide-adenine-dinucleotide-reduced[c]|
MANNI1PPHOS 0.0     |Mannitol 1-phosphate[c]| + |H2O[c]| => |Mannitol[c]| + |Phosphate[c]|
MANNIDEH    0.0     |Nicotinamide-adenine-dinucleotide[c]| + |Mannitol[c]| => |Nicotinamide-adenine-dinucleotide-reduced[c]| + |Fructose[c]|
MANNIPTS    10.0    |Mannitol[e]| + |Phosphoenolpyruvate[c]| => |Mannitol 1-phosphate[c]| + |Pyruvate[c]|
Checking File Changes with Git
Now that the model has been updated it will be useful to track the changes that have been made.
First it will be helpful to get a summary of all the files have been modified in the model. Since the changes have been tracked with Git the files that have changed can be viewed by using the following Git command:
(psamm-env) $ git status
The output of this command should show that the exchange, compound, and
model.yaml files have changed and that there is a new file that is not
being tracked named mannitol_pathway.yaml. First the new mannitol pathway
file can be added to the Git repository so that future changes can be tracked
using the following commands:
(psmam-env) $ git add mannitol_pathway.yaml
Then specific changes in individual files can be viewed by using the
git diff command followed by the file name. For example to view the changes
in the compounds.yaml file the following command can be run.
(psamm-env) $ git diff model.yaml
The output should look like the following:
@@ -5,6 +5,7 @@ compounds:
   - include: compounds.yaml
   reactions:
   - include: reactions.yaml
+  - include: mannitol_pathway.yaml
   exchange:
   - include: exchange.yaml
   limits:
This can be done with any file that had changes to make sure that no
accidental changes are added in along with whatever the desired changes are.
In this example there should be one line added in the model.yaml file,
three compounds added into the compounds.yaml file, and one exchange
reaction added into the exchange.yaml file along with one change that removed
glucose from the list of carbon sources in the exchange settings (by changing the lower
bound of its exchange reaction to zero).
Once the changes are confirmed these files can be added with the Git add command.
(psamm-env) $ git add compounds.yaml
(psamm-env) $ git add exchange.yaml
(psamm-env) $ git add model.yaml
These changes can then be committed to the repository using the following command:
(psamm-env) $ git commit -m 'Addition of mannitol utilization pathway and associated compounds'
Now the model has been updated and the changes have been committed. The Git log
command can be used to view what commits have been made in the repository.
This allows you to track the overall progress as well as examine what
specific changes have been made. More detailed information between the commits
can be viewed using the git diff command along with the commit ID that you
want to compare the current version to. This will tell you specifically what
changes occurred between that commit and the current version.
You can also view a log of the commits in the model by using the following command:
(psamm-env) $ git log
This can be helpful for getting an overall view of what changes have been made to a repository.
The Git version tracking can also be used with GitHub, BitBucket, GitLab or any other Git hosting provider to share repositories with other people. This can enable you to collaborate on different aspects of the modeling process while still tracking the changes made by different groups and maintaining a functional model.
Using PSAMM to export the model to other Software
If you want to export the model in a format to use with other software, that is also possible using PSAMM. The YAML formatted model can be easily exported as an SBML file using the following command:
(psamm-env) $ psamm-model sbmlexport Modified_core_ecoli.xml
This will export the model in SBML level 3 version 1 format which can then be used in other software that support this format.